package xx.oracle.apps.icx.por.rcv.webui;
import com.sun.java.util.collections.ArrayList;
import java.sql.PreparedStatement;
import java.sql.ResultSet;
import oracle.apps.fnd.common.MessageToken;
import oracle.apps.fnd.framework.OAApplicationModule;
import oracle.apps.fnd.framework.OAAttrValException;
import oracle.apps.fnd.framework.OAException;
import oracle.apps.fnd.framework.OAViewObject;
import oracle.apps.fnd.framework.webui.OAPageContext;
import oracle.apps.fnd.framework.webui.beans.OAWebBean;
import oracle.apps.fnd.framework.webui.beans.OAWebBeanTable;
import oracle.apps.icx.por.rcv.server.ReturnItemsVOImpl;
import oracle.apps.icx.por.rcv.webui.RtnSrchCO;
import oracle.jbo.Row;
public class XXRtnSrchCO6 extends RtnSrchCO
{
public void processFormRequest(OAPageContext pageContext, OAWebBean webBean)
{
pageContext.writeDiagnostics(this, "Dbg : XXRtnSrchCO Start Process From Request ",1);
OAApplicationModule am = pageContext.getApplicationModule(webBean);
ReturnItemsVOImpl vo1 = (ReturnItemsVOImpl)am.findViewObject("ReturnItemsVO");
String str1 = null;
String str2 = null;
String str3 = null;
String usrId = null;
try
{
str1 = pageContext.getParameter("event");
}
catch(Exception e)
{
pageContext.writeDiagnostics(this, "Dbg : Exception at str1 "+e,1);
}
try
{
str2 = pageContext.getParameter("value");
}
catch(Exception e)
{
pageContext.writeDiagnostics(this, "Dbg : Exception at str2 "+e,1);
}
try
{
str3 = pageContext.getParameter("source");
}
catch(Exception e)
{
pageContext.writeDiagnostics(this, "Dbg : Exception at str3 "+e,1);
}
try
{
usrId = ""+pageContext.getUserId();
}
catch(Exception e)
{
pageContext.writeDiagnostics(this, "Dbg : Exception at usrId "+e,1);
}
pageContext.writeDiagnostics(this, "Dbg : usrId "+usrId,1);
pageContext.writeDiagnostics(this, "Dbg : str1 "+str1,1);
pageContext.writeDiagnostics(this, "Dbg : str2 "+str2,1);
pageContext.writeDiagnostics(this, "Dbg : str3 "+str3,1);
if (("goto".equals(str1)) && ("NavigationBar".equals(str3)) && ("2".equals(str2)))
{
pageContext.writeDiagnostics(this, "Dbg : Next button pressed. ",1);
Object rtnSrchVoName = (String)pageContext.getTransactionValue("RtnSrchVOName");
pageContext.writeDiagnostics(this, "Dbg : rtnSrchVoName "+(String)rtnSrchVoName, 1);
OAWebBeanTable resultsTblBean = (OAWebBeanTable)webBean.findIndexedChildRecursive("ResultsTableRN");
if (resultsTblBean != null)
{
pageContext.writeDiagnostics(this, "Dbg : resultsTblBean Entered", 1);
resultsTblBean.setViewUsageName((String)rtnSrchVoName);
OAViewObject rtnSrchVO = (OAViewObject)am.findViewObject((String)rtnSrchVoName);
if(rtnSrchVO!=null)
{
Row[] headrRow = rtnSrchVO.getAllRowsInRange();
pageContext.writeDiagnostics(this, "Dbg : Length of rtnSrchVO rows is "+headrRow.length, 1);
ArrayList errMsg = new ArrayList();
if(headrRow.length >0)
{
for (int j = 0; j < headrRow.length; j++)
{
Row currRow = headrRow[j];
oracle.jbo.domain.Number returnQty = null;
try
{
returnQty = (oracle.jbo.domain.Number)currRow.getAttribute("ReturnQuantity");
}
catch (Exception ex)
{
pageContext.writeDiagnostics(this,"Dbg : returnQty Exception "+ex,1);
}
pageContext.writeDiagnostics(this,"Dbg : returnQty "+returnQty,1);
if(returnQty!=null)
{
String query4 = "select xx_rcpt_oaf_pkg.is_rcpt_qty_elig(:1) from dual";
String isValidDecimal =null;
try
{
PreparedStatement pStmt = am.getOADBTransaction().createPreparedStatement(query4, 1);
pStmt.setString(1,returnQty.toString());
for(ResultSet rs = pStmt.executeQuery(); rs.next();)
{
if(rs != null)
{
isValidDecimal = rs.getString(1);
}
}
pStmt.close();
}
catch(Exception e)
{
pageContext.writeDiagnostics(this,"Dbg : isValidDecimal Exception "+e,1);
}
pageContext.writeDiagnostics(this,"Dbg : isValidDecimal "+isValidDecimal,1);
if(isValidDecimal!=null && isValidDecimal.length()>0 && isValidDecimal.equalsIgnoreCase("Y"))
{
pageContext.writeDiagnostics(this,"Dbg : Only 2 Decimal places are allowed at Receipt Quantity ",1);
OAAttrValException ex1 = new OAAttrValException(111,rtnSrchVO.getFullName(),currRow.getKey(),"ReturnQuantity",returnQty,"XX","XX_RCPT_QTY_DCML_MSG", null, (byte)0);
errMsg.add(ex1);
}
}
}
if (errMsg.size()> 0)
{
pageContext.writeDiagnostics(this,"Dbg : Throwing Bundle exceptions ",1);
OAAttrValException.raiseBundledOAAttrValException(errMsg);
}
}
}
}
}
pageContext.writeDiagnostics(this, "Dbg : XXRtnSrchCO Process From Request End",1);
super.processFormRequest(pageContext, webBean);
}
}
Saturday, 12 December 2020

Displaying Exception Messages in OAF
public void processFormRequest(OAPageContext pageContext
,OAWebBean webBean)
{,OAWebBean webBean)
super.processFormRequest(pageContext, webBean);
if(pageContext.getParameter("item1")!=null)
{
String name=pageContext.getParameter("item6");
throw new OAException(name,OAException.ERROR);
}
if(pageContext.getParameter("item1")!=null)
{
String name=pageContext.getParameter("item6");
throw new OAException(name,OAException.CONFIRMATION);
}
if(pageContext.getParameter("item1")!=null)
{
String name=pageContext.getParameter("item6");
throw new OAException(name,OAException.WARNING);
}
}
Useful OAF Profiles
Personalize Self-Service Defn - To enable the personalization link on every page
FND: Personalization Region Link Enabled - To enable the personalization link on every region
FND: Diagnostics - To enable diagnostics on OAF page
FND: Personalization Seeding Mode - To allow edition of custom personalization
Disable Self-Service Personal - For disabling all personalization’s
Fnd Xliff Export Root Path - Use this profile option to set the root path used to generate the full path where the Xliff files are exported to when users extract their translated personalization using the Extract Translation Files page in OA Personalization Framework. The permissions for the root path directory that you specify must be set to read, write, create for all users, using chmod 777 [dir_path].
Xliff Import Root Path - Use this profile option to set the root path used to derive the full path from where the Xliff files are uploaded when users use the Upload Translations page in OA Personalization Framework to upload translated personalization.
FND: Personalization Document Root Path - Use this profile option to define the root path where personalization documents are exported to or imported from when users use the Database page or the File System page of the Functional Administrator responsibility's Document Manager, respectively. We recommend you set this profile to the $APPL_TOP staging area: $APP_TOP/<CompanyIdentifier>/<CustomProductShortName>/<product-version>/mds/webui of the current deployed environment, where personalization documents are to be imported from or exported to. This profile option should be set at the Site level.
Unable to launch the Java Virtual Machine Located at path: ..\..\jdk\jre\bin\client\jvm.dll
Below error will receive when attempting to install jDeveloper 10g for OAF on a Windows 10 desktop machine.
Error: Unable to launch the Java Virtual Machine Located at path: ..\..\jdk\jre\bin\client\jvm.dll
Solution: Please do the following setup to fix the above issue.
Run regedit (remember to run it as the administrator) from your system
- Expand HKEY_LOCAL_MACHINE
- Expand SOFTWARE
- Expand Microsoft
- Expand Windows
- Expand CurrentVersion
- Expand App Paths
- At App Paths, add a new KEY Name it: jdevW.exe Expand jdevW.exe
- Modify the (DEFAULT) value to the full pathway to the jdeveloper executable
- ex: "c:\jdev\jdevbin\jdev\bin\jdevW.exe"
- Create a new STRING VALUE called PATH and set it value to the jdeveloper pathway
- ex: "c:\Jdev\jdevbin\jdk\jre\bin" Save and close regedit
Sunday, 8 April 2018
OAF Importer commands
OAF Importer commands
Page Importer:
java oracle.jrad.tools.xml.importer.XMLImporter $JAVA_TOP/xx/oracle/apps/po/custom/webui/PoDummyPG.xml -username apps -password apps -dbconnection "(DESCRIPTION=(ADDRESS=(PROTOCOL=tcp)(HOST=xxx)(PORT=1522))(CONNECT_DATA=(SERVICE_NAME=XXX)))" -rootdir $JAVA_TOP
JPX Importer:
java oracle.jrad.tools.xml.importer.JPXImporter $JAVA_TOP/xx/oracle/apps/icx/lov/server/XXPrj.jpx -username apps -password apps -dbconnection "(DESCRIPTION=(ADDRESS=(PROTOCOL=tcp)(HOST=xxx)(PORT=1522))(CONNECT_DATA=(SERVICE_NAME=xxx)))"
Page Importer:
java oracle.jrad.tools.xml.importer.XMLImporter $JAVA_TOP/xx/oracle/apps/po/custom/webui/PoDummyPG.xml -username apps -password apps -dbconnection "(DESCRIPTION=(ADDRESS=(PROTOCOL=tcp)(HOST=xxx)(PORT=1522))(CONNECT_DATA=(SERVICE_NAME=XXX)))" -rootdir $JAVA_TOP
JPX Importer:
java oracle.jrad.tools.xml.importer.JPXImporter $JAVA_TOP/xx/oracle/apps/icx/lov/server/XXPrj.jpx -username apps -password apps -dbconnection "(DESCRIPTION=(ADDRESS=(PROTOCOL=tcp)(HOST=xxx)(PORT=1522))(CONNECT_DATA=(SERVICE_NAME=xxx)))"
Saturday, 7 April 2018
OAF Apache Bounce Steps in R12.2
OAF Apache Bounce Steps in R12.2
Login to Putty
Step 1 : Perform the below steps to Set the environment
login as: appldev
appldev@xxx password: Enter password
[appldev@xxx ~]$ cd ../..
[appldev@xxx ~]$ cd /u01/EBSDEV/APPS
[appldev@xxx APPS]$ . EBSapps.env run
E-Business Suite Environment Information
----------------------------------------
RUN File System : /u01/EBSDEV/APPS/fs1/EBSapps/appl
PATCH File System : /u01/EBSDEV/APPS/fs2/EBSapps/appl
Non-Editioned File System : /u01/EBSDEV/APPS/fs_ne
DB Host: xxx Service/SID: EBSDEV
Sourcing the RUN File System ...
Step 2 : Run the adcgnjar to register the OAF changes to the weblogic server
[appldev@xxx APPS]$ cd $AD_TOP/bin
[appldev@xxx bin]$ adcgnjar
Copyright (c) 2002, 2012 Oracle Corporation
Redwood Shores, California, USA
AD Custom Jar Generation
Version 12.2.0
NOTE: You may not use this utility for custom development
unless you have written permission from Oracle Corporation.
Enter the APPS username: apps
Enter the APPS password:
customall.jar generated successfully.
Step 3 : Perform the below steps to stop the server
[appldev@xxx bin]$ cd $ADMIN_SCRIPTS_HOME
[appldev@xxx scripts]$ admanagedsrvctl.sh stop oacore_server1
You are running admanagedsrvctl.sh version 120.14.12020000.11
Enter the WebLogic Admin password:
Stopping oacore_server1...
Refer /u01/EBSDEV/APPS/fs1/inst/apps/EBSDEV_xxx/logs/appl/admin/log/adoacorectl.txt for details
Server specific logs are located at /u01/EBSDEV/APPS/fs1/FMW_Home/user_projects/domains/EBS_domain_EBSDEV/servers/oacore_server1/logs
admanagedsrvctl.sh: exiting with status 0
admanagedsrvctl.sh: check the logfile /u01/EBSDEV/APPS/fs1/inst/apps/EBSDEV_xxx/logs/appl/admin/log/adoacorectl.txt for more information ...
Step 4 : Perform the below steps to start the server
[appldev@xxx scripts]$ admanagedsrvctl.sh start oacore_server1
You are running admanagedsrvctl.sh version 120.14.12020000.11
Enter the WebLogic Admin password:
Calling txkChkEBSDependecies.pl to perform dependency checks for oacore_server1
*** ALL THE FOLLOWING FILES ARE REQUIRED FOR RESOLVING RUNTIME ERRORS
*** Log File = /u01/EBSDEV/APPS/fs1/inst/apps/EBSDEV_xxx/logs/appl/rgf/TXK/txkChkEBSDependecies_Sun_Feb_25_16_52_39_2018/txkChkEBSDependecies_Sun_Feb_25_16_52_39_2018.log
Perl script txkChkEBSDependecies.pl got executed successfully
Starting oacore_server1...
Server specific logs are located at /u01/EBSDEV/APPS/fs1/FMW_Home/user_projects/domains/EBS_domain_EBSDEV/servers/oacore_server1/logs
admanagedsrvctl.sh: exiting with status 0
admanagedsrvctl.sh: check the logfile /u01/EBSDEV/APPS/fs1/inst/apps/EBSDEV_xxx/logs/appl/admin/log/adoacorectl.txt for more information ...
[appldev@xxx scripts]$
Login to Putty
Step 1 : Perform the below steps to Set the environment
login as: appldev
appldev@xxx password: Enter password
[appldev@xxx ~]$ cd ../..
[appldev@xxx ~]$ cd /u01/EBSDEV/APPS
[appldev@xxx APPS]$ . EBSapps.env run
E-Business Suite Environment Information
----------------------------------------
RUN File System : /u01/EBSDEV/APPS/fs1/EBSapps/appl
PATCH File System : /u01/EBSDEV/APPS/fs2/EBSapps/appl
Non-Editioned File System : /u01/EBSDEV/APPS/fs_ne
DB Host: xxx Service/SID: EBSDEV
Sourcing the RUN File System ...
Step 2 : Run the adcgnjar to register the OAF changes to the weblogic server
[appldev@xxx APPS]$ cd $AD_TOP/bin
[appldev@xxx bin]$ adcgnjar
Copyright (c) 2002, 2012 Oracle Corporation
Redwood Shores, California, USA
AD Custom Jar Generation
Version 12.2.0
NOTE: You may not use this utility for custom development
unless you have written permission from Oracle Corporation.
Enter the APPS username: apps
Enter the APPS password:
customall.jar generated successfully.
Step 3 : Perform the below steps to stop the server
[appldev@xxx bin]$ cd $ADMIN_SCRIPTS_HOME
[appldev@xxx scripts]$ admanagedsrvctl.sh stop oacore_server1
You are running admanagedsrvctl.sh version 120.14.12020000.11
Enter the WebLogic Admin password:
Stopping oacore_server1...
Refer /u01/EBSDEV/APPS/fs1/inst/apps/EBSDEV_xxx/logs/appl/admin/log/adoacorectl.txt for details
Server specific logs are located at /u01/EBSDEV/APPS/fs1/FMW_Home/user_projects/domains/EBS_domain_EBSDEV/servers/oacore_server1/logs
admanagedsrvctl.sh: exiting with status 0
admanagedsrvctl.sh: check the logfile /u01/EBSDEV/APPS/fs1/inst/apps/EBSDEV_xxx/logs/appl/admin/log/adoacorectl.txt for more information ...
Step 4 : Perform the below steps to start the server
[appldev@xxx scripts]$ admanagedsrvctl.sh start oacore_server1
You are running admanagedsrvctl.sh version 120.14.12020000.11
Enter the WebLogic Admin password:
Calling txkChkEBSDependecies.pl to perform dependency checks for oacore_server1
*** ALL THE FOLLOWING FILES ARE REQUIRED FOR RESOLVING RUNTIME ERRORS
*** Log File = /u01/EBSDEV/APPS/fs1/inst/apps/EBSDEV_xxx/logs/appl/rgf/TXK/txkChkEBSDependecies_Sun_Feb_25_16_52_39_2018/txkChkEBSDependecies_Sun_Feb_25_16_52_39_2018.log
Perl script txkChkEBSDependecies.pl got executed successfully
Starting oacore_server1...
Server specific logs are located at /u01/EBSDEV/APPS/fs1/FMW_Home/user_projects/domains/EBS_domain_EBSDEV/servers/oacore_server1/logs
admanagedsrvctl.sh: exiting with status 0
admanagedsrvctl.sh: check the logfile /u01/EBSDEV/APPS/fs1/inst/apps/EBSDEV_xxx/logs/appl/admin/log/adoacorectl.txt for more information ...
[appldev@xxx scripts]$
Tuesday, 31 October 2017
Useful Codes Used in OAF -2
Method To Insert the record in the table.
write the following code in the AM
public void InsertRecord()
{
InsertVOImpl vo= getInsertVO1();
OADBTransaction trans= getOADBTransaction();
vo.executeQuery();
Row v_row;
v_row = (Row)vo.createRow();
vo.insertRow(v_row);
}
The following code shows the initialization process of AM in controller.
public void processRequest(OAPageContext pageContext, OAWebBean webBean)
{
super.processRequest(pageContext, webBean);
InsertRecordsAMImpl am=(InsertRecordsAMImpl)pageContext.getApplicationModule(webBean);
am.InsertRecord();
}
The following code shows the creation of record.
public void processFormRequest(OAPageContext pageContext, OAWebBean webBean)
{
super.processFormRequest(pageContext, webBean);
InsertRecordsAMImpl am=(InsertRecordsAMImpl)pageContext.getApplicationModule(webBean);
if(pageContext.getParameter("item6")!=null)
{
am.getOADBTransaction().commit();
throw new OAException("Data Created sucsessfully",OAException.CONFIRMATION);
}
}
write the following code in the AM
public void InsertRecord()
{
InsertVOImpl vo= getInsertVO1();
OADBTransaction trans= getOADBTransaction();
vo.executeQuery();
Row v_row;
v_row = (Row)vo.createRow();
vo.insertRow(v_row);
}
The following code shows the initialization process of AM in controller.
public void processRequest(OAPageContext pageContext, OAWebBean webBean)
{
super.processRequest(pageContext, webBean);
InsertRecordsAMImpl am=(InsertRecordsAMImpl)pageContext.getApplicationModule(webBean);
am.InsertRecord();
}
The following code shows the creation of record.
public void processFormRequest(OAPageContext pageContext, OAWebBean webBean)
{
super.processFormRequest(pageContext, webBean);
InsertRecordsAMImpl am=(InsertRecordsAMImpl)pageContext.getApplicationModule(webBean);
if(pageContext.getParameter("item6")!=null)
{
am.getOADBTransaction().commit();
throw new OAException("Data Created sucsessfully",OAException.CONFIRMATION);
}
}
Swap the values from one item to other items
Swap the values from one item to other items
public void processFormRequest(OAPageContext pageContext, OAWebBean webBean)
{
super.processFormRequest(pageContext, webBean);
if(pageContext.getParameter("item3")!=null)
{
String name=pageContext.getParameter("item1");
OAMessageStyledTextBean mst= (OAMessageStyledTextBean)webBean.findChildRecursive("item2");
mst.setValue(pageContext,name);
OAMessageTextInputBean mtib = (OAMessageTextInputBean)webBean.findChildRecursive("item1");
mtib.setValue(pageContext,null);
}
}
public void processFormRequest(OAPageContext pageContext, OAWebBean webBean)
{
super.processFormRequest(pageContext, webBean);
if(pageContext.getParameter("item3")!=null)
{
String name=pageContext.getParameter("item1");
OAMessageStyledTextBean mst= (OAMessageStyledTextBean)webBean.findChildRecursive("item2");
mst.setValue(pageContext,name);
OAMessageTextInputBean mtib = (OAMessageTextInputBean)webBean.findChildRecursive("item1");
mtib.setValue(pageContext,null);
}
}
Thursday, 5 January 2017
Creating Custom Webadi Template in Oracle Apps
Custom Webadi creation in Oracle Apps
Webadi Summary:
Oracle Web ADI is being used by the End Users in the Oracle E-Business Suite to perform some of their day-to-day data entry tasks in the commonly used Microsoft desktop applications like Excel and upload the data to EBS.
To create the custom Web ADI,We need two responsibilities.
- Desktop Integration Manager(lets you creating/Managing Integrator and parameters)
- Desktop Integrator(lets you create Document, layout, Mapping, Setup options etc.,)
Below are the steps to create the Web ADI
1.Create database table: We use this table to load the data by using Web ADI template.
1.Create database table: We use this table to load the data by using Web ADI template.
Table Script:
CREATE TABLE xxcust_stage_table
(
project_number VARCHAR2(100)
,task_number VARCHAR2(100)
,description VARCHAR2(100)
);
2. Create Package: We use this package to do the validations before uploading the data to the custom table.
Package Specification:
CREATE OR REPLACE PACKAGE xxcust_webadi_demo_pkg
AS
/*
* Developer :
* Client/Project :
* Database :
* Date :
* Description : This package contains the logic for Web ADI upload
* Issue :
* Version Control:
* Author Version Date Change
* ------- ------- -------- -------
*/
PROCEDURE xxcust_webadi_stg (
icproject_number VARCHAR2
,ictask_number VARCHAR2
,icdescription VARCHAR2
);
END;
/
Package Body:
CREATE OR REPLACE PACKAGE BODY APPS.xxcust_webadi_demo_pkg
AS
/*
* Developer :
* Client/Project :
* Database :
* Date :
* Description : This package contains the logic for webadi upload
* Issue :
* Version Control:
* Authour Version Date Change
* ------- ------- -------- -------
*/
PROCEDURE project_validation (
p_project_number VARCHAR2
,p_proj_valid OUT NUMBER
)
IS
BEGIN
SELECT COUNT (1)
INTO p_proj_valid
FROM pa_projects_all pa
WHERE pa.segment1 = p_project_number
AND pa.project_status_code = 'APPROVED'
AND TRUNC (sysdate) BETWEEN pa.start_date AND NVL (pa.completion_date, TRUNC (sysdate));
END project_validation;
PROCEDURE task_validation (
p_task_number xxcust_stage_table.task_number%TYPE
,p_project_number xxcust_stage_table.project_number%TYPE
,p_task_valid OUT NUMBER
)
IS
BEGIN
SELECT COUNT (1)
INTO p_task_valid
FROM pa_tasks pt
,pa_projects_all ppa
WHERE pt.project_id = ppa.project_id
AND pt.task_number = p_task_number
AND pt.chargeable_flag = 'Y'
AND ( pt.completion_date IS NULL
OR pt.completion_date > TO_DATE (sysdate, 'dd/mm/yyyy'))
AND ppa.segment1 = p_project_number;
END task_validation;
PROCEDURE xxcust_webadi_stg (
icproject_number xxcust_stage_table.project_number%TYPE
,ictask_number xxcust_stage_table.task_number%TYPE
,icdescription xxcust_stage_table.description%TYPE
)
IS
l_projnumber NUMBER DEFAULT 0;
l_tasknumber NUMBER DEFAULT 0;
l_exptype NUMBER DEFAULT 0;
l_vatcode NUMBER DEFAULT 0;
l_gl_code NUMBER DEFAULT 0;
l_trans_date_valid CHAR;
l_trans_pa_date_valid CHAR;
l_exp_message VARCHAR2 (2000) DEFAULT NULL;
l_app_id NUMBER;
e_invalid EXCEPTION;
l_valid CHAR;
BEGIN
project_validation (icproject_number,l_projnumber);
IF l_projnumber = 0
THEN
l_exp_message := 'Project Number does not exist';
END IF;
task_validation (ictask_number
,icproject_number
,l_tasknumber
);
IF l_tasknumber = 0
THEN
l_exp_message:='Receiver Task Number does not exist';
END IF;
IF l_exp_message IS NOT NULL
THEN
RAISE e_invalid;
ELSE
INSERT INTO xxcust_stage_table
(project_number
,task_number
,description
)
VALUES (
icproject_number
,ictask_number
,icdescription
);
END IF;
EXCEPTION
WHEN e_invalid
THEN
raise_application_error (-20002, l_exp_message);
WHEN OTHERS
THEN
raise_application_error (-20000, SQLCODE || ':' || SQLERRM);
END;
END;
/
3.Create an integrator:
Navigate to -->Desktop Integration Manager - > Create Integrator

Step 1 :
Click on Create Integrator. Below page will open and enter the required details and select the checkbox ‘Display in Create Documents Page’ and click on the Next Button

Click on Create Integrator. Below page will open and enter the required details and select the checkbox ‘Display in Create Documents Page’ and click on the Next Button
Integrator Name: Custom Webadi Test Template
Internal Name: XXCUST_WEBADI_TEMPLATE
Application: Projects

Step2:
Enter the Interface Name :xxcust_webadi_demo_pkg
Interface Type: Select API Procedure from drop down list
Package Name :xxcust_webadi_demo_pkg(Give the package name as mentioned in step2)
Procedure Name:xxcust_webadi_stg(Select the main procedure name of the package:xxcust_webadi_demo_pkg)
API Returns : Select FND Message Code from the list of values. This will help to show the error message in the webadi template

Enter the Interface Name :xxcust_webadi_demo_pkg
Interface Type: Select API Procedure from drop down list
Package Name :xxcust_webadi_demo_pkg(Give the package name as mentioned in step2)
Procedure Name:xxcust_webadi_stg(Select the main procedure name of the package:xxcust_webadi_demo_pkg)
API Returns : Select FND Message Code from the list of values. This will help to show the error message in the webadi template

Click on Apply button and the below page will open.


click on the select radio button as highlighted above and the below page will open


To create list of value for the webadi column,click on the pencil button as highlighted below and enter the details
Validation Type: Table
Id column: segment1(column name)
Meaning: segment1(column name)
Validation Entity: pa_projects_all(table name)
Lov Type : Pop up List

Validation Type: Table
Id column: segment1(column name)
Meaning: segment1(column name)
Validation Entity: pa_projects_all(table name)
Lov Type : Pop up List
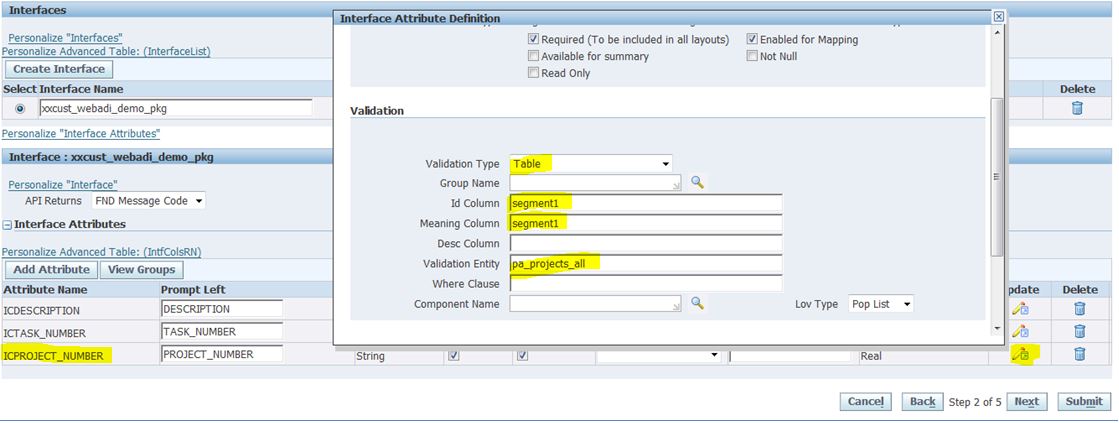
Save the details and click on Next
Step 3:
click on Next .
Step 4 :
Step 4 :

select the From template from list of values as mentioned below

Click on create button

Click on Next
Step 5:

click on Submit

Custom integrator is ready now.
4.Create the Layout.
Navigate to Desktop Integrator --> Define Layout

Select Integrator name(We have created from the above steps) from the drop down list.

click on Go button

click on Create

Enter Layout Name and click on Next

click on Next

click on Apply

Integrator Layout is created successfully.
Download the Webadi Template
Navigate to Desktop Integrator --> Create Document

Download the Webadi Template
Navigate to Desktop Integrator --> Create Document

Step 1 :

select the Integrator name from drop down list and click on Next

click on Next

click button Create Document

Click on Open

Click on Allow and wait till the below Webadi template creates

Webadi Template with List of Values

Tuesday, 16 June 2015
Oracle Alerts
Oracle Alerts:
Alerts in EBS allows you to monitor your Business information's to keep
•Be informed of database exceptions as and when they happen
•Sending Notifications to business user
•Performing routine database tasks automatically
•Calling Concurrent Programs, Shell Scripts and Operating System Scripts
There are two type of Alerts, Event and Periodic.


Alerts in EBS allows you to monitor your Business information's to keep
•Be informed of database exceptions as and when they happen
•Sending Notifications to business user
•Performing routine database tasks automatically
•Calling Concurrent Programs, Shell Scripts and Operating System Scripts
There are two type of Alerts, Event and Periodic.
Event Based Alert:
These Alerts are fired/triggered based on some change in data in the database.
Ex: If u want to notify your manager when you create an item
in the inventory you can use event based alerts. When you create an item in the
inventory it will create a new record in mtl_system_items_b, here inserting a
record in the table is an event so whenever a new record is inserted it will
send the alert. In same alert you can also send the information related to that
particular item.
Periodic Alert:
These Alerts are triggered hourly, daily, weekly, monthly or yearly based on your input.
Ex: If you want to know list of items created on that day at the end of day you can use periodic alerts repeating periodically by single day. This alert is not based on any changes to database. This alert will notify you every day regardless of data exists or not that means even if no items are created you will get a blank notification.
Creating an Event Alert:
Defining an Alert:
1. Responsibility –> Alert Manager.
2. Navigate to the Alerts Window.
Alert –> Define
3. Define a Period Alert:
Application = Human Resources
Name = xxscc_test1
Enable = Selected.
4. Event
Application = Human Resources
Table = PER_ALL_PEOPLE_F
5. Enter the following SQL statement.
Select employee_number
into&emp_num from
Per_all_people_f where rowid=:rowid

6. Verify, to check whether the syntax written is correct.
7. Save
8. Define Alert Actions:
Action Name: send_email_notification

7. Save
8. Define Alert Actions:
Action Name: send_email_notification

8. Define Action Details:
Click on Action Details Button
TO : Give you email ID here.
Note : You can also put here also bind variable with &email if that taken in select statement.
Subject: Give Subject of your Email.
Text: hello, this is test email &emp_num

Click on Action Details Button
TO : Give you email ID here.
Note : You can also put here also bind variable with &email if that taken in select statement.
Subject: Give Subject of your Email.
Text: hello, this is test email &emp_num

9- Define Action Sets
Click on Action Sets Button.
Action Set Name = Send Email Test
Go to Action Set Details –> Members.
Action = send_email_notification as shown below.
Click on Action Sets Button.
Action Set Name = Send Email Test
Go to Action Set Details –> Members.
Action = send_email_notification as shown below.

10- Define Operating Unit
Click on Alert Details Button from first Alert Window.
Navigate to Installation Tab.
Operating Unit = <Your Operating Unit> for me it is US Federal Government.

11- Save.
Now if you update or Create New Employee you will received notification in given email id.
Follow the below navigation to check the Alert history:
N->Alert Manager ->Alert -> History
Stored in: ALR_ACTION_HISTORY table

Follow the below navigation to check the Alert history:
N->Alert Manager ->Alert -> History
Stored in: ALR_ACTION_HISTORY table

Run Periodic Alerts Forcefully:
N-> Alert Manager-> Request ->Check

N-> Alert Manager-> Request ->Check

Saturday, 13 June 2015
Run the Concurrent Program on priority basis
We can set the priority of the concurrent program as follows.
1.If we know the user of the program.
In oracle EBS we can set the priority of specific users so that when they run specific reports, those reports should be run on high priority.
1.Go to Sysadmin Responsibility and go to menu Profile > System.
2.Make sure Site and User boxes are checked.
3.Select the user name for the user for whom you want to increase the priority
4.Enter the following within the Profile box and click on Find: Concurrent:Request Priority
5.Change the priority for the user as you see fit (1 is highest, 99 is lowest, 50 is the default) , Save and exit.
2.If we know the program name and then we can run that program as priority.
Please follow the below steps:
1.Login system administrator /Application developer and go to define concurrent screen
Under Concurrent >> Program >> Define
2.Find the Program name whose priority you wish to change for ex. "Payable Transfer to GL"
3.On this screen you can set priority of this request by entering value in "Priority" field( as mark in red) (1 is highest, 99 is lowest, 50 is the default) , Save and exit.
1.If we know the user of the program.
In oracle EBS we can set the priority of specific users so that when they run specific reports, those reports should be run on high priority.
1.Go to Sysadmin Responsibility and go to menu Profile > System.
2.Make sure Site and User boxes are checked.
3.Select the user name for the user for whom you want to increase the priority
4.Enter the following within the Profile box and click on Find: Concurrent:Request Priority
5.Change the priority for the user as you see fit (1 is highest, 99 is lowest, 50 is the default) , Save and exit.
2.If we know the program name and then we can run that program as priority.
Please follow the below steps:
1.Login system administrator /Application developer and go to define concurrent screen
Under Concurrent >> Program >> Define
2.Find the Program name whose priority you wish to change for ex. "Payable Transfer to GL"
3.On this screen you can set priority of this request by entering value in "Priority" field( as mark in red) (1 is highest, 99 is lowest, 50 is the default) , Save and exit.
Wednesday, 10 June 2015
To get the DFF and KFF deifinition details from back end
Use the below query to get the DFF and KFF definition details from back end
select *
from fnd_descriptive_flexs
where application_table_name='RA_CUSTOMER_TRX_ALL'
select *
from fnd_descr_flex_column_usages
where descriptive_flexfield_name='RA_INTERFACE_HEADER'
and application_column_name='INTERFACE_HEADER_ATTRIBUTE1'
select *
from fnd_descriptive_flexs
where application_table_name='RA_CUSTOMER_TRX_ALL'
select *
from fnd_descr_flex_column_usages
where descriptive_flexfield_name='RA_INTERFACE_HEADER'
and application_column_name='INTERFACE_HEADER_ATTRIBUTE1'
Sunday, 29 March 2015
Overview of Procure to Pay Cycle
Overview of Procure to Pay Cycle
Procure to Pay cycle in Oracle is the cycle which is concerned with the cycle of procurement of raw materials, parts and products which the the business needs to manufacture its end products. Procure to Pay cycle is concerned with the procurement of the raw materials from suppliers to prepare the finished goods to the step of payment to the supplier for the goods purchased. The procure to Pay cycle like the Order to Cash one has certain steps involved.
Create Purchase Requisition
Create Purchase Order
Receive the PO
Enter Invoice
Pay
1. Purchase Requisition
The first step in initiating the purchase of goods is the creation of a purchase requisition. A purchase requisition is a formal requisition to buy something. Purchase requisition represents a demand for a good in the business
Purchase Requisition represents demand for materials either through Work in Progress,Inventory , Materials requirement planning or Order Management.
A requisition might be internal or external
Internal Requisition : An internal requisition is generally prepared in case of inter organization transfer
Purchase Requisition: A purchase requisition is generally created when the business needs to procure materials from external sources ie its suppliers to fulfill the requirements raised by Inventory,Work in Progress, Materials Requirement Planning or Order Management
In simple terms we can say that a requisition refers to a purchase request initiated by the various department people when the business has certain material requirements
2. Purchase Order
After the purchase requisition has been created and approved , the next step is the creation of purchase order.
The purchase order is the document having details of the materials which need to be procured, supplier details, this document is shared with the supplier in order to procure the required materials.
When a PO is created in the system the status of the PO is generally incomplete, before we can progress with the PO the PO needs to be approved by the approvers setup in the system so that it can be sent across to the suppliers and then received.
Depending on the business Requirements, a purchase order can be of different types:
1] Standard: Create standard purchase orders for one-time purchases of various items. You create standard purchase orders when you know the details of the goods or services you require, estimated costs, quantities, delivery schedules, and accounting distributions.
2] Blanket: Create blanket purchase agreements when you know the detail of the goods or services you plan to buy from a specific supplier in a period, but you do not yet know the detail of your delivery schedules.
3] Contract: Create contract purchase agreements with your suppliers to agree on specific terms and conditions without indicating the goods and services that you will be purchasing.
4] Planned: A planned purchase order is a long-term agreement committing to buy items or services from a single source. You must specify tentative delivery schedules and all details for goods or services that you want to buy, including charge account, quantities, and estimated cost.
3. Receiving
After the Purchase Order has been sent across to the supplier the supplier will deliver the goods to the specified warehouse where the task of receiving has to be performed.
When the shipping details of the goods are received by the supplier receipts are created in the system.
The receipt creation and the receiving mechanism can differ based on the Routing mechanism set up in the system. We will discuss the Routing mechanism in the upcoming post.
After the receiving is performed , the onhand for the items are increased in the system and the goods are available to fulfill the business demands.
4. Invoice
Once the goods have been received the business needs to pay for the procured goods. Payables invoices are created in the system for the Purchase orders to pay off the outstanding amount.
Invoices can be created either individually or through invoice batches
System can setup a recurring invoice creation faciltiy to create invoices at periodic intervals
Invoices can be created electronically via EDI
After the Invoices are created the invoices need to be validated with the purchase order or the the Purchase Receipt to match for the quantity and pricing. Invoices need to be validated before they can be paid off.
5. Payment
Once the invoices have been validated they are eligible for payment. Payments for the invoices can be done individually or payment batch can be created which pay off groups of Invoices.
Invoices can be paid off by a variety of mechanisms including checks, manual payments, wire transfers, EDI payments, bank drafts, and electronic funds transfer.
This is how a Procure to Pay ( P2P) cycle works in Oracle.
Procure to Pay cycle in Oracle is the cycle which is concerned with the cycle of procurement of raw materials, parts and products which the the business needs to manufacture its end products. Procure to Pay cycle is concerned with the procurement of the raw materials from suppliers to prepare the finished goods to the step of payment to the supplier for the goods purchased. The procure to Pay cycle like the Order to Cash one has certain steps involved.
Create Purchase Requisition
Create Purchase Order
Receive the PO
Enter Invoice
Pay
1. Purchase Requisition
The first step in initiating the purchase of goods is the creation of a purchase requisition. A purchase requisition is a formal requisition to buy something. Purchase requisition represents a demand for a good in the business
Purchase Requisition represents demand for materials either through Work in Progress,Inventory , Materials requirement planning or Order Management.
A requisition might be internal or external
Internal Requisition : An internal requisition is generally prepared in case of inter organization transfer
Purchase Requisition: A purchase requisition is generally created when the business needs to procure materials from external sources ie its suppliers to fulfill the requirements raised by Inventory,Work in Progress, Materials Requirement Planning or Order Management
In simple terms we can say that a requisition refers to a purchase request initiated by the various department people when the business has certain material requirements
Impact
on tables and important columns:
PO_REQUISITION_HEADERS_ALL
Important
Columns: -
REQUISITION_HEADER_ID à Primary Key
SEGMENT1 à Requisition Number
AUTHORIZATION_STATUS à Requisition Status ( After
Approval the status
Will be ‘APPROVED’. )
PO_REQUISITION_LINES_ALL
Important Columns: -
REQUISITION_LINE_ID à Primary Key
ITEM_ID
UNIT_PRICE à Unit Price of the Item
QUANTITY à Required Quantity
PO_REQ_DISTRIBUTIONS_ALL
Important Columns: -
DISTRIBUTION_ID à Primary Key
CODE_COMBINATION_ID à Unique identifier for the
General Ledger charge account
After the purchase requisition has been created and approved , the next step is the creation of purchase order.
The purchase order is the document having details of the materials which need to be procured, supplier details, this document is shared with the supplier in order to procure the required materials.
When a PO is created in the system the status of the PO is generally incomplete, before we can progress with the PO the PO needs to be approved by the approvers setup in the system so that it can be sent across to the suppliers and then received.
Depending on the business Requirements, a purchase order can be of different types:
1] Standard: Create standard purchase orders for one-time purchases of various items. You create standard purchase orders when you know the details of the goods or services you require, estimated costs, quantities, delivery schedules, and accounting distributions.
2] Blanket: Create blanket purchase agreements when you know the detail of the goods or services you plan to buy from a specific supplier in a period, but you do not yet know the detail of your delivery schedules.
3] Contract: Create contract purchase agreements with your suppliers to agree on specific terms and conditions without indicating the goods and services that you will be purchasing.
4] Planned: A planned purchase order is a long-term agreement committing to buy items or services from a single source. You must specify tentative delivery schedules and all details for goods or services that you want to buy, including charge account, quantities, and estimated cost.
Impact
on tables and important columns:
1.
PO_HEADERS_ALL
Important
Columns: -
PO_HEADER_ID à Primary Key.
SEGMENT1 à Purchase Order Number.
AUTHORIZATION_STATUS
à PO Status (After Approval
the status
will be ‘APPROVED’. )
2. PO_LINES_ALL
Important
Columns: -
PO_LINE_ID à Primary Key.
ITEM_ID à Inventory Item ID.
QUANTITY à Quantity Ordered on the line.
UNIT_PRICE à Item Unit Price.
3. PO_LINE_LOCATIONS_ALL
Important
Columns: -
LINE_LOCATION_ID à Primary Key.
QUANTITY à Inventory Item ID.
SHIP_TO_LOCATION_ID à Quantity Ordered on the line.
4. PO_DISTRIBUTIONS_ALL
Important
Columns: -
PO_DISTRIBUTION_ID à Primary Key.
CODE_COMBINATION_ID à Unique identifier for the General Ledger charge
account
3. Receiving
After the Purchase Order has been sent across to the supplier the supplier will deliver the goods to the specified warehouse where the task of receiving has to be performed.
When the shipping details of the goods are received by the supplier receipts are created in the system.
The receipt creation and the receiving mechanism can differ based on the Routing mechanism set up in the system. We will discuss the Routing mechanism in the upcoming post.
After the receiving is performed , the onhand for the items are increased in the system and the goods are available to fulfill the business demands.
Impact
on tables :
1. RCV_SHIPMENT_HEADERS
2.
RCV_SHIPMENT_LINES
3. RCV_TRANSACTIONS
Once the goods have been received the business needs to pay for the procured goods. Payables invoices are created in the system for the Purchase orders to pay off the outstanding amount.
Invoices can be created either individually or through invoice batches
System can setup a recurring invoice creation faciltiy to create invoices at periodic intervals
Invoices can be created electronically via EDI
After the Invoices are created the invoices need to be validated with the purchase order or the the Purchase Receipt to match for the quantity and pricing. Invoices need to be validated before they can be paid off.
Impact on tables and important columns:
AP_INVOICES_ALL
Important Columns: -
INVOICE_ID à Primary Key.
INVOICE_NUM à Invoice number
INVOICE_AMOUNT à Invoice amount
VENDOR_ID àSupplier identifier
2. AP_INVOICE_LINES_ALL
Important
Columns: -
INVOICE_ID à Primary Key.
LINE_NUMBER à Inventory Item ID.
LINE_TYPE_LOOKUP_CODE à Quantity Ordered on the line.
UNIT_PRICE à Item Unit Price.
3. AP_INVOICE_DISTRIBUTIONS_ALL
Important
Columns: -
INVOICE_ID à Invoice identifier
DISTRIBUTION_LINE_NUMBER à Distribution number
ACCOUNTING_DATE à Accounting date.
JE_CATEGORY_NAME à Inventory Item ID.
DIST_CODE_CMBINATION_ID à Quantity Ordered on the line.
4. XLA_AE_HEADERS
Important
Columns: -
AE_HEADER_ID à Invoice identifier
GL_TRANSFER_STATUS_CODE à Distribution number
ACCOUNTING_DATE à Accounting date.
5. XLA_AE_LINES
Important Columns: -
AE_HEADER_ID à Accounting entry header ID
AE_LINE_NUM à Accounting entry Line Number
CODE_COMBINATION_ID à Code Combination ID
GL_SL_LINK_ID à GL subledger Link ID – Used
to establish link with Journal
Lines (GL_JE_HEADER and GL_JE_LINES)
ENTERED_DR à Entered Dr. Amount
ENTERED_CR à Entered Cr. Amount5. Payment
Once the invoices have been validated they are eligible for payment. Payments for the invoices can be done individually or payment batch can be created which pay off groups of Invoices.
Invoices can be paid off by a variety of mechanisms including checks, manual payments, wire transfers, EDI payments, bank drafts, and electronic funds transfer.
Impact
on tables:
New IBY tables
in R12:
IBY_PAY_SERVICE_REQUESTS - Payment Process Request information (11i Terminology is Payment Batch)
IBY_PAY_INSTRUCTIONS_ALL
- Payment Instruction information
IBY_DOC_PAYABLES_ALL
- Invoice information stored by IBY for generating payment
IBY_PAYMENTS_ALL
- Payment Information
The
following tables are used in PPR in R12 . These were used in 11i for payment
batches also.
AP_INV_SELECTION_CRITERIA_ALL
AP_SELECTED_INVOICES_ALL
The
following AP tables are still in use in R12 to store payment related
information.
AP_INVOICE_PAYMENTS_ALL
AP_CHECKS_ALL
AP_PAYMENT_HISTORY_ALL
Subscribe to:
Posts (Atom)